Dine With Rabia

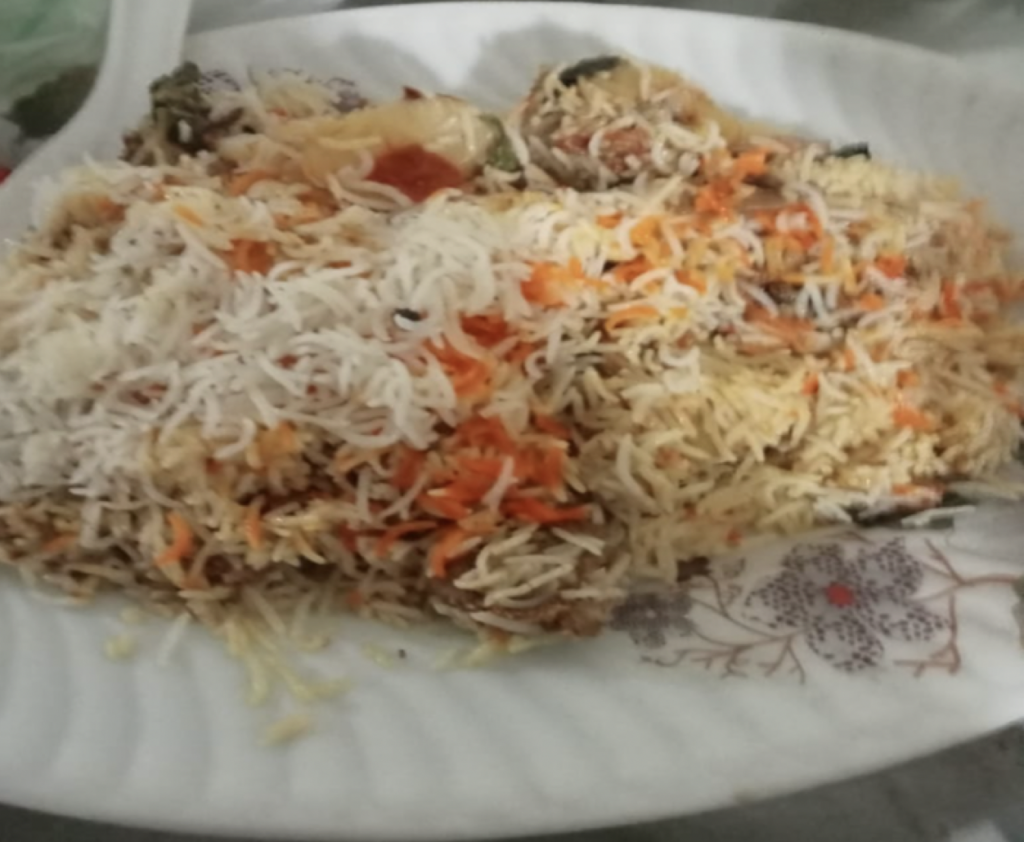
As our festive season is around the corner, I decided to look at the delicious cuisine that all Asians must-have on this special occasion. “I’d like to share one of the most well-known South Asian classic recipes, Biryani,” which is especially famous in Pakistan. We enjoy it at weddings and festivals. It is a must-have dish when we invite guests to our place.

The aroma of biryani in abroad always reminds me of special times and joy in Pakistan. The nicest part about biryani is sharing it with family and friends. My grandmother passed down the family recipe for biryani to my mother, and I’m fortunate that I learned to make it from her.

Ingredients:

Cooked by Rabia
  • 1/2 kg of lamb or chicken
  • 1 cup of cooking oil
  • 1 tbs. Warmed spices
  • 4 Fried Onions
  • 1 tbsp. ginger-garlic paste
  • 2 Tomatoes
  • 1/2 cup of yoghurt
  • 1 tsp. Lemon juice
  • 4-6 Green chillies
  • 1 tbsp. red chilli powder
  • 1 Teaspoon Salt
  • Pinch saffron
  • 1/2 kg of Basmati rice

Recipe:

  1. Take a stainless-steel pot, add a half cup of oil, and heat it over medium heat. Add the onions and cook for 10–15 minutes. Add the ginger-garlic paste and cook it until everything turns golden brown. It almost seems like it’s going to burn, but this is okay.
  2. Add lamb or chicken along with all other ingredients except saffron, lemon, and rice. Cook uncovered, stirring constantly, until the tomatoes are soft. Lower the heat to low. Add a half cup of water. Mix it well and simmer it until the meat becomes soft and tender. And this will be your
  3. Meanwhile, boil the rice in another large pot and bring 4 quarts of water to a boil with 2 tablespoons of salt. Add washed basmati rice to boiling water. Boil it for 4 minutes, and then Drain it in a colander.
  4. Mix lemon juice and saffron.
  5. Gently Layer the basmati rice on top of the khurma. Sprinkle the saffron-lemon mixture over the rice. Cover the pot tightly and simmer it for 12–15 minutes or until the rice is tender. When it’s finished, give it a couple good stirs to spread the meat and spices. It does not have to be perfectly even.
  6. Serve with yoghurt chutney or just on its own.
  7. Enjoy!

Written by Rabia Saleem

New Orlean’s Red Beans & Rice

While completing my Master’s degree at Tulane University in New Orleans, Louisiana, I found the top-notch post-grad comfort food I’ve taken with me ever since. After a day of work, the last thing I want to do is come home and cook an entire meal. Luckily, red beans and rice can be adapted to a slow cooker. Allowing me to throw all my ingredients in and come home to an amazing-smelling apartment with the most satisfying warm bowl waiting for me.

There’s something to the name “The Big Easy” that describes New Orleans because the people and the food take life a bit slower and enjoy every savoury bit together. My favourite memory in New Orleans is when my friends and I prepped a massive stock of red beans and rice for the week of Mardi Gras. This is an entire week of festivities and parade floats where the city quite literally shuts down since everyone participates. It was so comforting every night (or early morning) to come back from the parades and dish out the prepped meal that would fill you up, stick to your bones, and help you fall sound asleep with more than enough energy for the next days of parades.

My first red beans and rice in New Orleans

Red beans and rice is a Cajun dish with Haitian influence and contains the “holy trinity” – bell pepper, onion, and celery. You can find this vegetable blend in the base of almost every Cajun meal, including etouffee, jambalaya, and gumbo. Red beans and rice are traditionally made with a stovetop pot set on a low boil all day. However, the ease of a slow cooker is made with the PhD student in mind as it also keeps well during the week. The most important piece is to get red beans and soak them for about 12 hours before cooking them. This will make the beans more digestible as well as more hearty. Andouille is a Cajun spiced sausage that might be at a speciality butcher shop. Another crucial ingredient, Slap Ya Mama (yes, you read that right), is only available in the U.S. Slap Ya Mama seasoning has its name because “every time a mama uses it, she receives a loving slap on the back and a kiss on the cheek for another great dish”. There are so many great memories I have from my time in New Orleans and I’m happy to share my favorite meal. I hope you are able to replicate this dish and taste the Southern Comfort that is very true for New Orleans.

Laissez les bons temps rouler!

Recipe:

Serves 6, Cook time is 4 –8 hours

  • 450 grams of dried red kidney beans (New Orleans Camelia brand recommended)
  • 450 grams Andouille sausage (or smoked), sliced ½ inch
  • 4 tablespoons olive oil
  • 1 yellow onion, diced
  • 4 ribs celery, diced
  • 1 green bell pepper, chopped
  • 4 cloves garlic
  • 1 bunch green onions, chopped and divided
  • 3 cups chicken broth
  • 3 cups water
  • 1 tablespoon Slap Ya Mama seasoning
  • 1 teaspoon black pepper
  • 1 teaspoon dried thyme
  • 1 teaspoon dried oregano
  • 3 bay leaves
  • Handful of fresh parsley, chopped

For serving:

  • Cooked long-grain white rice
  • Hot sauce

Instructions:

  1. Rinse beans and soak.
  2. Brown sausages in oil on both sides. Set aside.
  3. In the same pan, add garlic and onion, sauté for 2-3 minutes until transparent. Then add the bell pepper, celery, and half of the green onions. Sauté for 5 minutes.
  4. To the slow cooker, add your cooked vegetables. Then add the red beans, black pepper, Slap Ya Mama, dried thyme, oregano, and bay leaves.
  5. Add the water and chicken broth.
  6. Set the slow cooker to high setting for 4 hours or low for 8 hours.
  7. When beans are ready, take out 1 ½ cups to mash and put back in pot.
  8. Remove the bay leaves and add the sausage back in. Cook until sausage is hot.
  9. Serve over a bowl of hot white rice with hot sauce, green onions, and parsley for garnish.

Notes:

  • In New Orleans, they also add a split-faced grilled sausage to the top.
  • This can be adapted to an Instant Pot (Pressure Cooker) as well. Just set the pressure to high for 60 minutes with a 15-minute natural release.
  • If the beans seem too thick, add more water.
  • This is a great dish that can be stored for a week or frozen for two months.

Enjoy!!!

Written by Alysia Scott

#DineWithRonja: Wedding cake struggles

What feels like ages ago now, my friend had asked me to bake the cake for her wedding. Sounds like a big ask at first. But I managed to talk myself off the ledge I climbed onto with the face every person pulled that I told of this plan. Simply by remembering that she is fully aware of who I am and never wanted a classic wedding cake but rather a little something to remind her of the good old days when we’d bake together. Her, following the recipe to a t and me, doing my darndest to find a way to make it our own, have a little fun with it and usually ending up making the cake a little worse than it would have been had I just stayed out of it. After plenty of back and forth, I decided on Fanta cake. With the wedding in the height of the strawberry season, what better than a sponge base with a little cornucopia of strawberries perched atop a vanilla cream dream? But the height of strawberry season also means scorching summer… It was a scorching hot day, with the sun beaming down mercilessly. As I meticulously assembled the cake, whispers of doubt crept in. Would the cream layer melt and cause the cake to run off in the heat?

But hey, the best part of this cake is the base, anyway. So I shoved away the doubts and got on with it: In a mixing bowl, I beat 4 eggs, 250g sugar and a pack of vanilla sugar until they reached a fluffy consistency. Then added 125ml of oil and 150ml of Fanta, creating a harmonious blend. Gradually, I mixed in 250ml of flour and 3 tsp of baking powder until all ingredients were well incorporated.

I started out neat enough, with a clear space and ingredients all lined up neatly…

While that baked at 180°C for not quite 25 mins on a well-greased tray I started worrying about the problem child: the cream mixture. This is a funny one not just because it made me worry on the day, but it was also the reason I couldn’t really test bake here in Dublin because you can’t buy ‘schmand’ over here. I have since learned that schmand is simply sour cream with 20% instead of 10% fat and that crème fraiche is the same thing with 30% fat. So I could have saved myself a headache had I just mixed sour cream and crème fraiche and tested baking over here rather than the day before in a rush… anyway, I mixed together combine 600 ml of cream, 400 ml of sour cream, 2 packets of vanilla sugar, and 2 packets of dr oetker vanilla paradise cream, a no boil vanilla pudding. And only when the cake is cold, this gets spread all over it. Mine was still lukewarm, but it worked still.

And finally, don’t underestimate how long it takes to wash and arrange the strawberries. And how many do you need. The recipe says 1.5kg. But mine were so big that I needed to run back to the shops that morning to get more, even though I had more than 1.5kg of good strawberries left.. But I made it. Everything seemed doable yet. That’s when things turned tits up. The cake glaze didn’t work for me. First, it didn’t want to solidify, and then it just kept running off the cake. When spreading the vanilla cream, I tried to make a little barrier around the outside of the cake. And at first, that worked well enough. But the strawberries were so high that I needed to fill in more and more cake glaze that just kept seeping off the cake onto the counter and away. But that was going to have to be a tomorrow problem.

…But chaos soon took over. If you look closely, you can even make out the initials of the happy couple in the strawberries.

Quickly dressed friends already showed up to take me to the wedding. In an instant of sound thinking, I grabbed a spare tray and some ice packs to keep the cake cool on a scorching day and felt all the better for it when everyone else was overheating and with the cake on my lap, my thighs were positively frozen.

It even survived the ceremony in the car before we arrived at the venue, where it was finally placed in a fridge again before everyone got to try it and comment.

I think that may have been the first cake I ever made that no one told me how I could have improved on it after they tried it. Everyone seemed delighted, the strawberries were really juicy and flavourful, and even people who didn’t know I made the cake but thought it was part of the catering complimented it. Not sure that’s what my friend had in mind when tasking me with the cake, but she seemed delighted even though I didn’t deliver one of my classic disasters. Maybe there’s a point to recipes after all.

And yet this was all that was left of it by the time I made it to the desert buffer.

Written by Ronja Struck

#DineWithFederica

Hello everyone!

My best friend turned 30 over the weekend, and I decided to surprise her by coming to her party in Palermo 🥰  

While I was in Palermo, I asked my grandmother to cook for me one of my favourite dishes: pasta alla norma. Who knew that I would be writing a blog post about it during my back flight to Dublin?! 

It is typical Sicilian pasta that reminds me of my childhood summer that I used to spend with my relatives in our sea house. ☺️Those months of holidays were really packed with activities: morning at the beach, lunch at home, a quick nap, and a play date with friends until my mom came home from work (good times 😂).  For lunch, my grandmother used to make me pasta alla norma, which I ate sitting on a low wall on the patio. I loved that moment, and I’m sure you will love this delicious pasta 😊

Ingredients:

  • Aubergines
  • Sunflower and olive oil 
  • Pasta 
  • Tomato sauce 
  • Grated cheese (we use a typical cheese named ricotta salata, but it is possible to use parmigiano as well)
  • Basil 

Method

Step 1: Rinse the aubergine and pat dry with kitchen paper. Then, chop them into cubes of small sizes.

Step 2: Drizzle a splash of sunflower oil into a large frying pan and heat it. Once hot, add the aubergines in a single layer and fry until softened and golden -stirring occasionally.

Step 3: Place the fried aubergine in a single layer on a kitchen towel to drain the oil. In this way, the aubergine will be crunchy. 😋

Step 4: Add a splash of olive oil to a pan or pot, and when the oil is warm, add the tomato sauce. Add the salt and leave to cook on low heat for a few minutes.

Step 5: Meanwhile, cook the pasta in a pot of boiling salted water until “al dente”, which means that it should be soft enough to eat but still have a bit of bite and firmness to it.

Step 6: Drain the pasta and place it again in the pot. Then, add the tomato sauce and the aubergine and toss well.

Step 7:  Divide between bowls, grate over the cheese and finish with the basil scattered on top.

The last image is from the Internet, as I was too hungry and I forgot to take a pic 🙄

Buon appetito! (means enjoy 😋)

Written by Federica Cottone

#DineWithOlga

We all collect trophies and tokens to bring home during holidays. So, do I. Teas and spices are a zeal for me. For Christmas 2022, we stayed in Lanzarote, and I was determined to find something special in this part of Spain: a taste, a spice or a dish. With a careful touch by César Manrique’s vision, the volcano-shaped countryside inspires and recharges.

The time was festive, prompting me to make a featured dish. It would have been a roasted Turkey or Ham in Dublin, but what could I do on holidays? I came very quickly to an idea to cook Paella in our self-catering house. I tasted it several times but have yet to cook it myself. Why not? Although Paella is widely recognised as one of the most popular and renowned Spanish dishes, it’s important to note that the term “paella” (or more accurately, “la paella”) actually refers to the cooking pan used to prepare the dish rather than the dish itself.

Ingredients, including a Paella spices’ mix sachet, were easy to buy in the supermarket. All I needed was a recipe. Indeed, it is not a problem nowadays – just Google it! So, I cooked a Seafood Paella for our family Christmas Dinner. Yummy!

In February 2023, I attended a conference in Barcelona and chatted with my Spanish colleagues about Paella over lunch. What was a big surprise for me is that the authentic version has chicken but not seafood. Spanish still debate, indeed, how faithful Paella should taste. Modern Paella certainly, has many variations. For example, peas and chorizo. Having only chicken makes Paella close to Plov, Pilaf or Pilau – an Asian dish with rice, vegetables, spices and meat, which I do often anyway. This is one of my family’s favourite dishes. Now, I can do it a Spanish style. So, here is a chicken Paella recipe with optional ingredients for every taste. Enjoy!

Ingredients

2 tbsp olive oil [sunflower oil can also be used],
1 onion
1 tsp each hot smoked paprika, saffron or turmeric [to give yellow colour], dried thyme, grided black and red pepper, salt,
300g paella or risotto rice [1.5 standard size glass]
300g carrots [2-3 of average size]
5-6 cloves of garlic
1.2 kg chicken [it can be just tights or wings, or both]

Method

Step 1: Cut chicken is small pieces, grate carrots, and chop onions.

Step 2: Heat the olive oil in a large wok or casserole pot. Add the chicken and cook for 20-25 min.

Step 3: Add the chopped onion and grated carrots and soften for 5 mins.

Step 4: Add the smoked paprika, thyme and paella rice, and stir for 1-2 min.

Step 5: Add 3 glasses of water [so water covers rise excessively]. Season and cook, covered, for about 15 mins, stirring now and again until the rice is almost tender and still surrounded with some liquid.

Optional: A casserole pan is handy for chicken Paella as the chicken needs more space and longer cooking time than e.g. seafood. Chopped tomatoes [200g] can be added in step 4. Chicken can be replaced with the seafood mix [400g] but should be added when rice is cooked. Then rice should be cooked in chicken broth (750-800 ml). Chorizo can be added in Step 5. Squeeze over the lemon juice, sprinkle with chopped parsley and serve with the lemon wedges.

Enjoy cooking and dining!